Beekeeper
This project has moved. Full documentation and releases are now at beekeeperml.dev.
Beekeeper is a lightweight web app designed to allow you to do AI training on a remote server as part of your home lab. At its core, it’s designed to handle -
- Cloning a repository.
- Setting up the python environment(based on your requirements.txt)
- Remote log streaming
- Tensorboard Display
- File downloads
Current limitations:
- GitHub auth — Beekeeper has no method of authenticating with your remote repo. It only works on repos you’ve made public.
- HTTPS — For HTTPS, you’ll need to put Beekeeper behind a reverse proxy. It’s not ready to handle anything sensitive without one.
- Multi-server support — Eventually, I’d like a central Hive server managing multiple workers and farming jobs out. Today is not that day. This is a single-server product.
Authentication (login, sessions, API keys, user management) is implemented and available in the admin panel. It’s off by default for home lab use — enable it if your server is exposed beyond your local network.
Getting Started
Requirements
- Python 3.10+
- Git
- A Linux server with systemd(Currently tested on Ubuntu)
- One or more GPUs (optional but recommended)
Installation
Clone the repo and run the setup script. It creates a virtual environment, installs dependencies, and sets up a systemd service.
git clone https://github.com/bobcowher/beekeeper.git
cd beekeeper
bash setup.sh
The setup script will:
- Detect your Python version (3.12, 3.11, 3.10, or python3)
- Create a venv and install dependencies
- Generate and install a systemd service file (requires sudo)
- Enable and start the service
Once complete, Beekeeper is running on port 5000. Open http://your-server:5000 in a browser.
Managing the Service
# Check status
sudo systemctl status beekeeper

# View logs
journalctl -u beekeeper -f

# Restart
sudo systemctl restart beekeeper

# Stop
sudo systemctl stop beekeeper
Development Mode
If you prefer to run Beekeeper without systemd for development or testing:
cd beekeeper
source venv/bin/activate
python app.py
This runs Flask’s development server on port 5000 with auto-reload.
Creating a Project
From the dashboard, click + New Project and fill in:
| Field | Description | Default |
|---|---|---|
| Project Name | No spaces, used as the directory name | — |
| Git URL | Public Git repository URL | — |
| Branch | Git branch to clone and pull before each run | main |
| Python Version | Detected from system and conda | auto |
| Environment Type | venv or conda | venv |
| Training Script | Python file to execute when training starts | train.py |
| Tensorboard Log Dir | Where your script writes TB event files | runs |
| Requirements File | Pip requirements file installed at setup and before each run | requirements.txt |
| Setup Script | Optional shell script run at setup and before each training run | — |
| Data Dir (local) | Local path in the repo to symlink to your data volume | data |
| Data Dir (system) | Absolute path on the server to a persistent data volume | — |
| Output Paths to Save | Workspace-relative directories your training script writes to that should survive workspace cleanup (e.g. saved_models) |
— |
Every field has a tooltip — hover the ? icon for a description.
Once you submit, Beekeeper runs the following in the background:
- Git clone — clones the repository at the specified branch into a
workspace/directory - Create environment — creates a venv or conda env with the selected Python version
- Data dir symlink — if enabled, creates a symlink from
workspace/<local path>to the system data directory - Setup script — if configured and the file exists, runs it from the workspace root
- Pip install — installs packages from the requirements file
The project page refreshes automatically and shows the current step. If any step fails, the error is displayed and a Retry Setup button appears. Retry is smart — it skips the clone and environment creation if they already completed successfully, and picks up from the failed step.
Running Training
Once setup completes, the Training section appears on the project page. A branch picker is visible immediately — select the branch you want to train from and click Start.
Beekeeper runs the following sequence before launching your script:
- Git pull — pulls the latest code from the selected branch
- Data dir symlink — verifies or creates the symlink if a data directory is configured
- Setup script — runs your setup script if configured and present
- Pip install — installs/updates packages from the requirements file
- Launch — starts the training script as a detached subprocess
If any step fails, training is aborted and the error is shown on the project page.
Closing the browser tab has no effect on the running process.
Each active run appears as a row in the run list showing:
- Status badge —
starting,running,stopped, orcrashed - Branch name and Run ID
- Elapsed time
- Tensorboard link — if TB started for this run
- ▶ Logs — toggle to expand the inline log terminal for that run
- ■ Stop — stop this specific run
Hit ■ Stop to send SIGTERM (with a SIGKILL fallback after 5 seconds).
Parallel Runs
By default, Beekeeper allows one run at a time per project. To run multiple branches simultaneously, enable parallel runs in the project edit page:
| Setting | Description |
|---|---|
| Parallel Runs | Enable/disable concurrent training runs for this project |
| Max Parallel Runs | Maximum number of simultaneous runs allowed |
When parallel runs are enabled, a + Start Run… button appears below the active run list. Each parallel run gets its own full clone of the repository in a temporary workspace, its own log file, and its own Tensorboard instance. Completed parallel run workspaces are cleaned up automatically.
Each run is tracked by a Run ID — a unique integer assigned at start. The ID appears in the run row, in the log file header, and in the run history table.
Switching Branches
The Project Info card has an Active Branch dropdown. Selecting a different branch switches the project’s default branch immediately (equivalent to git checkout on the server). This affects the next training run’s git pull target.
Branch switching requires no running training jobs — Beekeeper will warn you if the workspace has uncommitted changes.
Environment Variables
Training scripts often need environment variables — API keys, config flags, hyperparameters. Click Edit on the project info card to add key-value pairs. These are passed to the training process at startup.
Setup Script
If your project needs system-level setup beyond pip — downloading a dataset, linking shared weights, generating config files — you can point Beekeeper at a shell script.
# example setup.sh (place this in your repo root)
#!/bin/bash
set -e

mkdir -p data

if [ ! -f data/iris.csv ]; then
    echo "Downloading dataset..."
    curl -fsSL https://raw.githubusercontent.com/mwaskom/seaborn-data/master/iris.csv \
         -o data/iris.csv
fi
Set Setup Script to setup.sh (or whatever your script is named) when creating or editing a project. Beekeeper will run it from the repository root:
- Once during initial project setup (after the environment is created, before pip install)
- Again before every training run (after git pull, before pip install)
The script is silently skipped if the file doesn’t exist, so you can set it once and it won’t cause errors on environments that don’t have it yet.
Data Directory
For projects that need access to a large persistent dataset stored elsewhere on the server — a mounted NAS share, a shared /data volume, or any local path — use the Data Directory fields.
| Field | Purpose |
|---|---|
| Data Dir (local) | Path within the repo to create as a symlink (default: data) |
| Data Dir (system) | Absolute path on the server to link to |
Beekeeper creates a symlink at workspace/<local> → <system path> during project setup, and ensures it exists again before each training run. Your training script just reads from data/ as if the dataset lived inside the repo.
Leave the system path blank if you don’t need this feature.
Saved Outputs
When parallel runs are enabled, each run gets a fresh workspace clone — but you probably want your model checkpoints to stick around. The Output Paths to Save field lets you list workspace-relative directories (one per line) that get linked into durable storage outside the workspace.
Each run gets its own directory under projects/<name>/persistent/runs/run_<id>/. Beekeeper creates symlinks inside the workspace before training starts, so your script writes to the usual path and the files land in persistent storage automatically.
TensorBoard logs are handled separately — no need to list them here.
Two environment variables are injected into every training process:
| Variable | Value |
|---|---|
BEEKEEPER_RUN_DIR |
Absolute path to this run’s persistent directory |
BEEKEEPER_TENSORBOARD_DIR |
Absolute path to this run’s TB log directory (inside BEEKEEPER_RUN_DIR) |
You can read these directly in your training script if you want explicit control over where files land.
Editing Project Settings
Click Edit on the project page to change:
- Git branch
- Training script path
- Tensorboard log directory
- Requirements file
- Setup script
- Data directory (local and system paths)
- Environment variables
- Parallel runs settings
Name, Git URL, Python version, and environment type are fixed after creation.
Viewing and Downloading Files
Expand the Files section on the project page to browse the project’s workspace directory. You can preview files inline, download individual files, or download entire directories as zip archives.
Inline Viewer
Click any viewable filename or the view button to open it in a modal without leaving the page.
| File type | Extensions | Behavior |
|---|---|---|
| Images | png, jpg, jpeg, gif, webp, svg, bmp, ico | Rendered inline. Auto-refreshes every 2 seconds — useful for monitoring debug images written during training. |
| Text / code | py, log, json, yaml, md, sh, csv, toml, js, ts, html, xml, and more | Displayed in a monospace viewer. Files over 1 MB fall back to download. |
Close the viewer with the × button, by clicking the backdrop, or by pressing Escape.
Using curl
The same endpoints that power the UI work with curl:
# List files in the project root
curl http://your-server:5000/projects/my-project/files/

# Download a specific file
curl -O http://your-server:5000/projects/my-project/files/checkpoints/model.pt

# Download a directory as a zip
curl -o checkpoints.zip 'http://your-server:5000/projects/my-project/files/checkpoints/?zip=1'
The JSON listing includes file names, sizes, and types — useful for scripting downloads of specific checkpoints or outputs.
Tensorboard
Tensorboard starts automatically when training starts and stops when training stops. It runs from the project’s own environment, so it uses whatever version of Tensorboard is in the project’s requirements.
The port is allocated dynamically starting at 6006. You can:
- View it inline in the iframe on the project page
- Expand the iframe to full height
- Open it directly in a new browser tab
- Clear accumulated Tensorboard logs with the Clear Tensorboard Logs button
Run History
Each project tracks its training runs. Expand the Run History section to see a table of past runs.
Each row shows:
- Run ID (
#N) — unique identifier, matches the ID shown in the active run list and log headers - Started — timestamp
- Duration — wall-clock time
- Status —
completed,crashed, orcanceled - Branch / Commit — branch name and short commit SHA at the time of the run
- Tags — custom labels you can add
- Actions — Notes toggle, log download
Starring Runs
Click the ⭐ button on any run row to star it. Starred runs:
- Are highlighted in the history table
- Are exempt from automatic pruning (they’ll never be deleted by the Cleanup Old Runs button)
- Can be filtered by clicking ★ Starred in the filter bar
Tags
Click the + button in the Tags cell to add comma-separated tags to a run (e.g., baseline,lr=0.01). Tags are searchable using the filter bar above the table.
Notes
Click + Notes on any row to expand a text area for free-form post-run observations. Notes are saved automatically when you click away.
Comparing Runs
Check the box on any two rows to enable the Compare selected button. The comparison modal shows both runs side by side — branch, status, commit, duration, tags, notes — plus a git diff between the two commits so you can see exactly what code changed between runs.
Filtering
The filter bar above the table has two controls:
- ★ Starred — toggle to show only starred runs
- Filter by tag — type to filter by tag name (partial match)
Log Archive
If the run produced a log, a Log link appears in the Actions column. Logs are kept independently of the run history — archived logs persist until manually deleted.
Pruning
The Cleanup Old Runs button removes old run records, keeping the most recent N runs (configurable). Starred runs are never pruned regardless of count. Clear All History removes all run records for the project.
REST API
Beekeeper exposes a REST API for programmatic control of projects. All endpoints return JSON with a consistent format:
{"success": true, "data": {...}}
{"success": false, "error": {"code": "...", "message": "..."}}
Key Endpoints
| Action | Method | Endpoint |
|---|---|---|
| List projects | GET | /api/v1/projects |
| Create project | POST | /api/v1/projects |
| Project detail | GET | /api/v1/projects/<name> |
| Delete project | DELETE | /api/v1/projects/<name> |
| Clone project | POST | /api/v1/projects/<name>/clone |
| Retry setup | POST | /api/v1/projects/<name>/setup/retry |
| Start training | POST | /api/v1/projects/<name>/training/start |
| Stop training | POST | /api/v1/projects/<name>/training/stop |
| Check status | GET | /api/v1/projects/<name>/training/status |
| Get logs | GET | /api/v1/projects/<name>/logs?tail=100 |
| Episode analysis | GET | /api/v1/projects/<name>/logs/analysis |
| Get metrics | GET | /api/v1/projects/<name>/tensorboard/latest |
| Run history | GET | /api/v1/projects/<name>/runs |
| List branches | GET | /api/v1/projects/<name>/branches |
| Switch branch | POST | /api/v1/projects/<name>/branch |
| List files | GET | /api/v1/projects/<name>/files |
| Download file | GET | /api/v1/projects/<name>/files/<path> |
| Busy check | GET | /api/v1/busy |
| System stats | GET | /api/v1/stats |
Full interactive reference: http://your-server:5000/api/v1/docs
The /training/start endpoint accepts an optional branch parameter to override the project’s default branch:
curl -X POST http://your-server:5000/api/v1/projects/my-project/training/start \
     -H 'Content-Type: application/json' \
     -d '{"branch": "experiment/new-arch"}'
The /training/status response includes a runs array, one entry per active run:
{
  "success": true,
  "data": {
    "runs": [
      {"run_id": 42, "branch": "main", "status": "running", "pid": 12345, "elapsed": 183.4}
    ]
  }
}
TensorBoard Metrics Analysis
The /tensorboard/latest endpoint analyzes your training metrics and returns insights:
curl http://your-server:5000/api/v1/projects/my-project/tensorboard/latest?detail=mediumWhich run is analyzed?
- If training is running, it analyzes the current active run
- If training is idle, it analyzes the most recent completed run
- The response includes
is_active: true/falseto indicate which
To compare with past runs:
# List all runs
curl http://your-server:5000/api/v1/projects/my-project/runs

# Get metrics for a specific past run
curl http://your-server:5000/api/v1/projects/my-project/runs/3/metrics
The response includes trend analysis, convergence detection, and anomaly detection for each metric:
| Field | Description |
|---|---|
trend |
Overall direction: improving, stable, worsening, or unstable |
recent_trend |
Trend of the last 20% of steps — computed on EMA-smoothed values, may differ from overall trend |
late_slope_pct |
Slope of the last 20% of training, normalized as % of total metric range — positive means still improving |
peak_value |
Best smoothed value reached during the run |
peak_step |
Step at which the smoothed peak occurred |
peak_reversal_pct |
How far the metric has moved away from its peak, as % of total range |
smoothed_final_value |
EMA-smoothed value at the end of the run (more stable than raw final) |
converged |
Boolean — has the metric stabilized? |
anomalies |
Array of unusual spikes or drops |
summary |
Human-readable interpretation |
Detail levels (?detail=low|medium|high):
low(default) — summary stats onlymedium— addssmoothed_points: ~100 EMA-smoothed data points representing the full training curve, suitable for plotting or trend interpretationhigh— also adds raw sampled points
Peak detection uses EMA smoothing (alpha=0.9), matching TensorBoard’s heavy smoothing setting. This prevents single noisy episodes from being reported as the peak — peak_reversal_pct > 50 on a reward metric is a reliable signal that the model peaked and has meaningfully regressed.
Agent Integration (MCP Server)
Beekeeper ships a Model Context Protocol (MCP) server that lets AI agents — Claude Code, Claude Desktop, or any MCP-compatible client — control training jobs directly without copy-pasting curl commands.
Install the MCP server
pip install beekeeper-mcpOr run it directly from the repo without installing:
python /path/to/beekeeper/mcp_server.pyRegister with Claude Code
Run this once in your terminal:
claude mcp add beekeeper -s user -e BEEKEEPER_HOST=http://your-server:5000 -- beekeeper-mcpIf auth is enabled, add -e BEEKEEPER_API_KEY=your-api-key before --. If beekeeper-mcp isn’t on your PATH after install, use the full path from which beekeeper-mcp.
Register with Claude Desktop
Add to ~/.claude/claude_desktop_config.json:
{
  "mcpServers": {
    "beekeeper": {
      "command": "beekeeper-mcp",
      "env": {
        "BEEKEEPER_HOST": "http://your-server:5000",
        "BEEKEEPER_API_KEY": "your-api-key"
      }
    }
  }
}
Available MCP Tools
| Tool | Description |
|---|---|
get_version |
Check MCP/server version compatibility — call this at session start |
list_projects |
List all projects and their status |
get_project |
Full project detail including current run state |
get_project_instructions |
Per-project agent instructions (goals, metrics, notes) |
training_status |
Current runs for a project |
start_training |
Start a run, optionally specifying a branch |
stop_training |
Stop a specific run by ID |
get_logs |
Tail the log for a run |
analyze_run |
Episode analysis from logs — trend, averages, quartiles |
get_stats |
System GPU/CPU/memory stats |
get_capacity |
Training slot capacity: total, running, and available headroom |
list_branches |
List remote branches for a project |
switch_branch |
Change the project’s active branch |
check_busy |
Check if the server is busy (use get_capacity for new workflows) |
create_project |
Create a new project, optionally with output_paths for persistent artifact storage |
delete_project |
Delete a project |
retry_setup |
Retry a failed project setup |
Starting a Claude session
Each project page has an API → Agent section with a ready-to-paste prompt. Paste it into Claude to orient the agent on the project:
You have the Beekeeper MCP server connected. Beekeeper manages ML training jobs on a remote GPU server.

Get oriented on the <project-name> project:
1. Call get_project_instructions("<project-name>") and read it fully
2. Call analyze_run("<project-name>") for current training state
3. Save key context (project name, primary metric, training goals) to your memory
4. Give me a status report: what's running, how it's performing, anything worth flagging
Organizing Projects
As your project list grows, the dashboard gives you two tools to stay organized.
Sort Order
A toggle in the Projects header switches between:
- Last Run (default) — projects you’ve trained most recently float to the top. Projects that have never been run sink to the bottom.
- A–Z — alphabetical order.
Your preference is saved in the browser and remembered across sessions.
Pinning
Click the 📌 icon on any project row to pin it. Pinned projects always appear above the sorted list, regardless of sort order. Click again to unpin. Pin state is saved in project.json on the server.
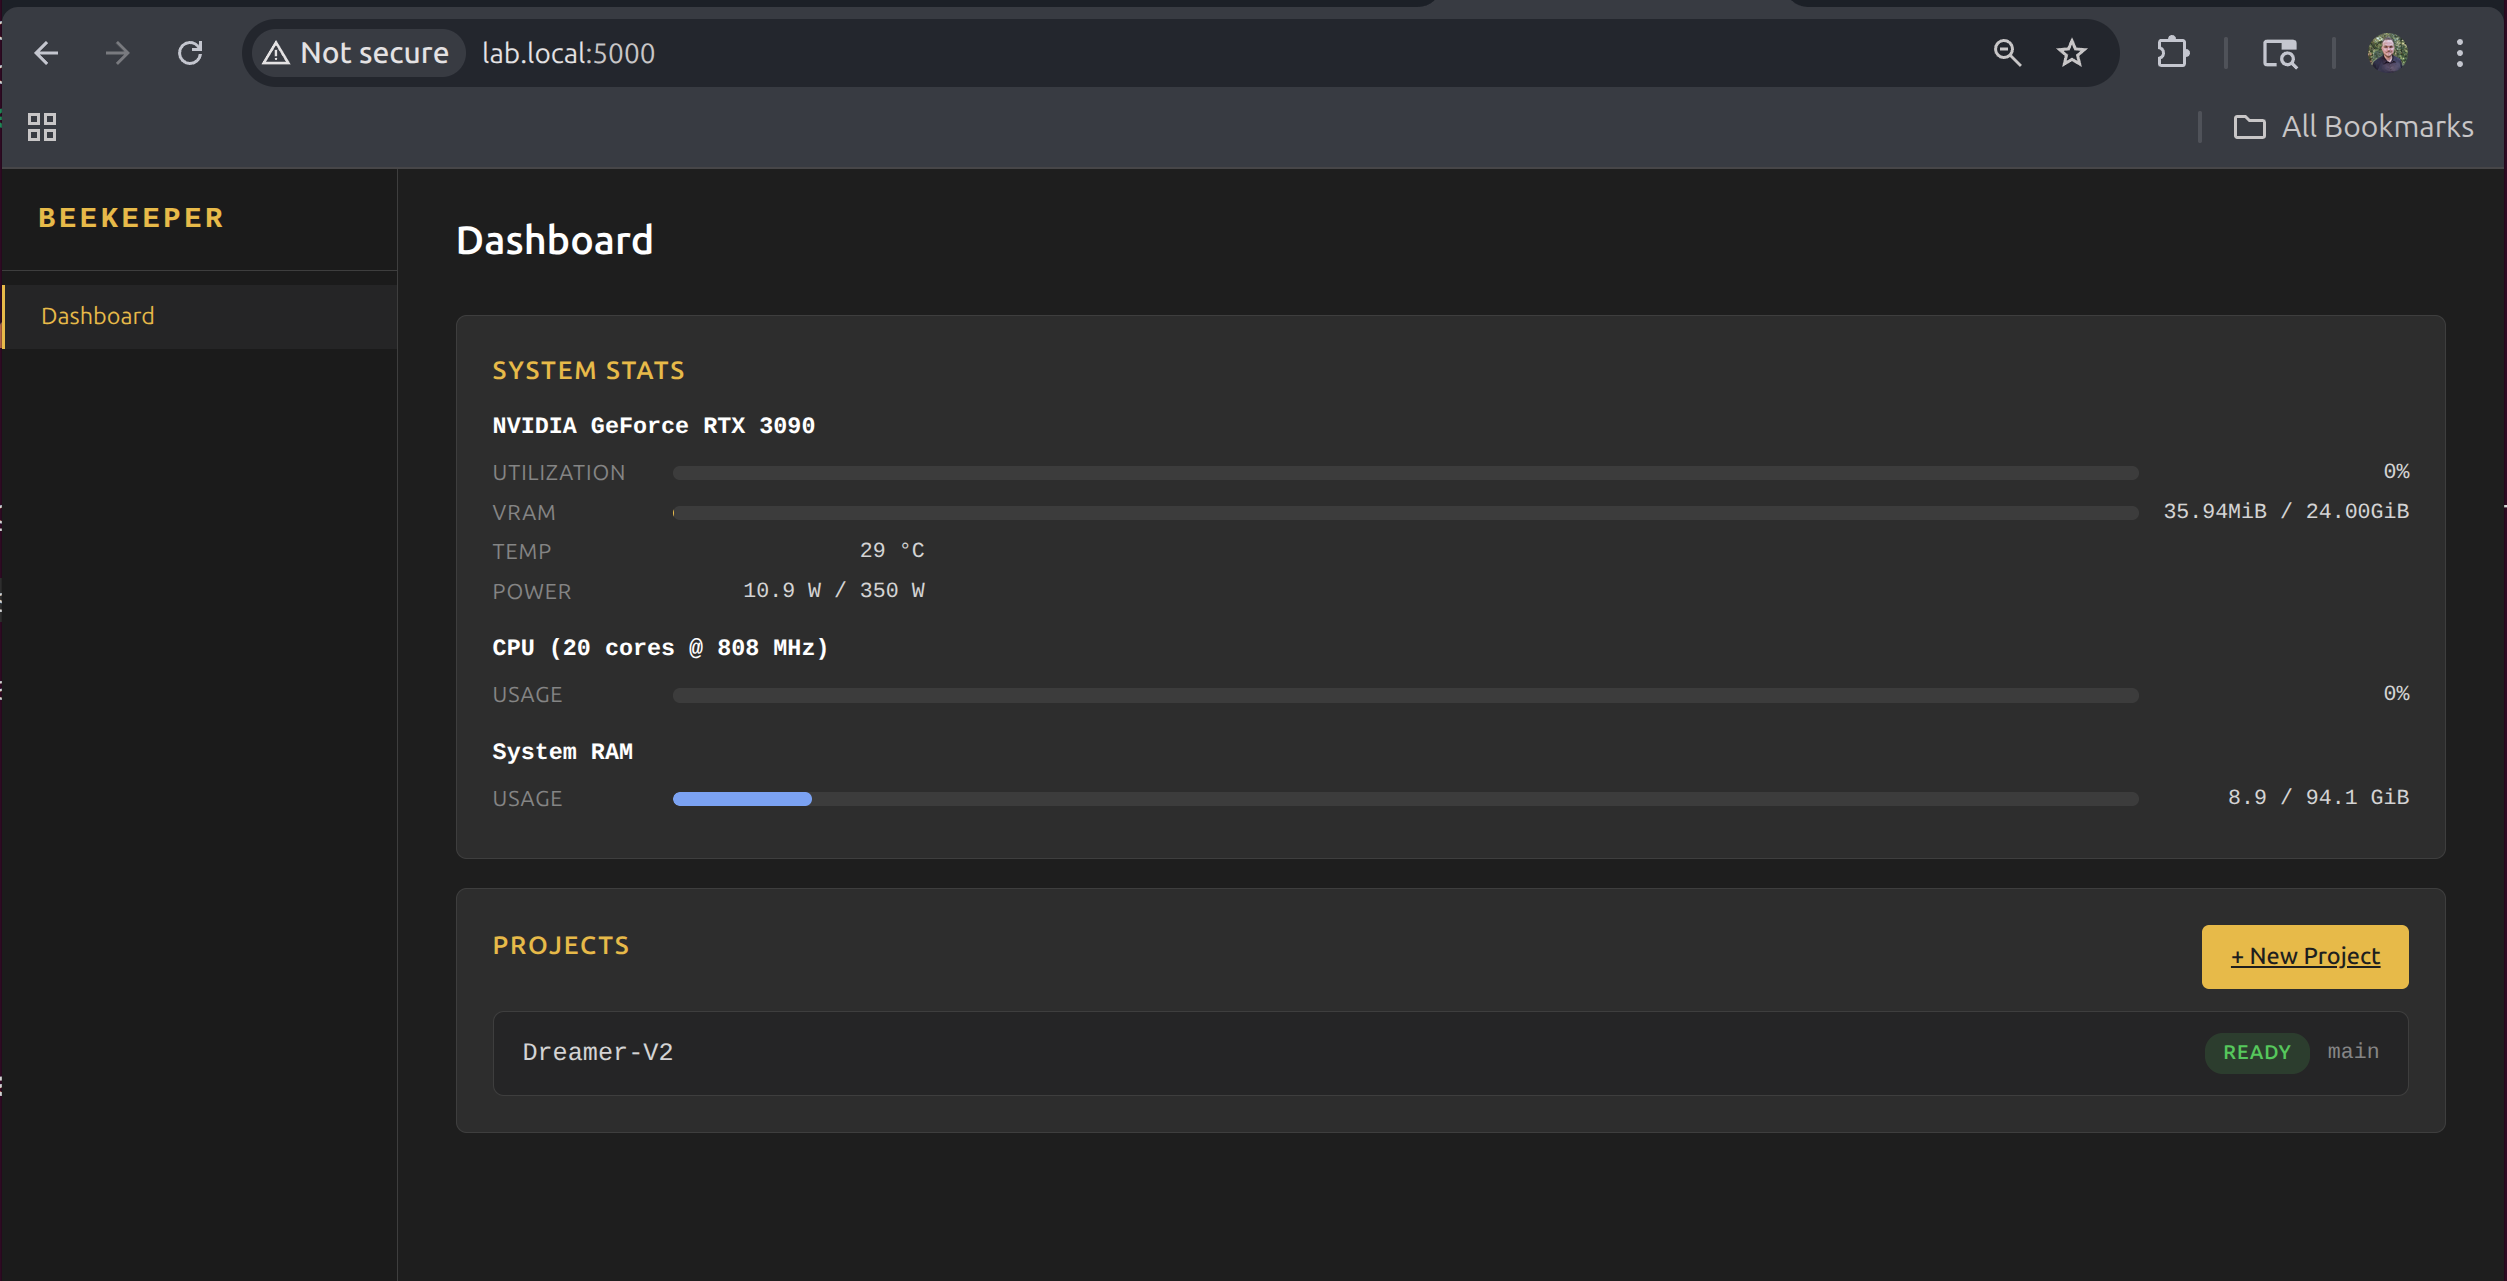
System Stats
The dashboard shows live GPU, CPU, and memory stats, updated every 2 seconds. GPU monitoring uses nvitop for detailed per-GPU utilization, temperature, VRAM, and power draw.
Project Structure
Beekeeper organizes everything under its install directory:
projects/— one subdirectory per projectproject.json— config and stateworkspace/— cloned git repovenv/— Python environmenttrain.log— training output
app.py— Flask approutes/— HTTP endpointsservices/— business logicmodels/— data modelstemplates/— Jinja2 templatesstatic/— CSS and JSsetup.sh— installation script
Notes
- Beekeeper runs with a single Gunicorn worker (
-w 1) because training state is tracked in memory. The setup script configures this automatically. - Training processes are fully detached — they survive browser disconnects, but not server reboots. After a reboot, the systemd service restarts Beekeeper, but any previously running training jobs will need to be restarted from the UI.
- Authentication is available but off by default. Enable it from the Admin panel if your server is reachable beyond your local network.